And no, they're nothing like the oily plaits of your school days!
Did you always hate braiding your hair as a child? The thought of those geeky, oily plaits done up in black ribbon are too fresh in your head to want to try new braiding styles. Think afresh! Check out five contemporary braids that look oh-so amazing! Tie up your hair in style and jazz it up with funky hair accessories to make a statement. We’ve got the perfect braids for you to match your every mood and occasion, from a day out at the beach to a hectic day at work. Just follow the simple steps and picture tutorial to give your hair a braided make-over.
Top 5 Braided Hairstyles:
1. Classic French Braid
Many of you have already tried this one but it may be completely unknown to others. Luckily for you, it’s a style will never goes out of fashion. Jazz it up by accessorizing with cool hair clips or flowers depending on the occasion. Just follow the steps below to create your very own classic French braid.
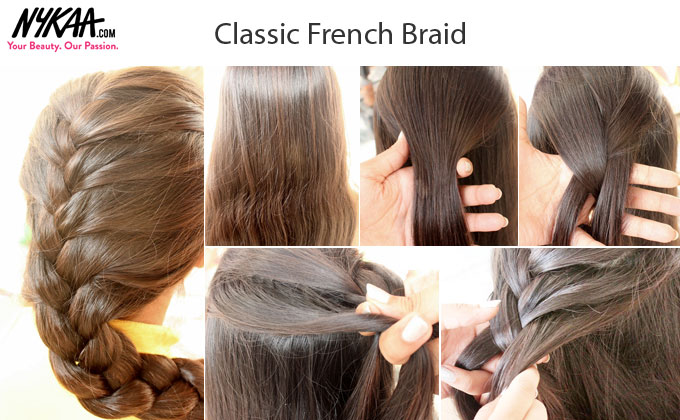
Step 1: Comb and detangle your hair. Spray on some hair spray like Paul Mitchell Fast Drying Sculpting Spray for extra hold if you have frizzy hair.
Step 2: Take a section of hair from the crown area.
Step 3: Section it into three parts and start braiding your hair as you normally would for three-strand braiding.
Step 4: Now start adding small sections to the strand from the side at each step of braiding. For the left strand add a small section from the left side of your head and so on.
Step 5: Keep adding sections to your braid until all the remaining hair is tucked into the braid. Tie the braid with an elastic band at the bottom to secure.
That’s it! You’ll have a pretty braid in just few minutes. Although, it may take some time to master this braid, practice will make you better. Besides, even a messy French braid looks cool!
2. Dutch Braid
If you know how to make a French braid, making a Dutch braid is a breeze. It looks like the French braid, with just one tiny difference. But when you look at a completed French braid and a Dutch one, you’ll be able to spot the difference right away.
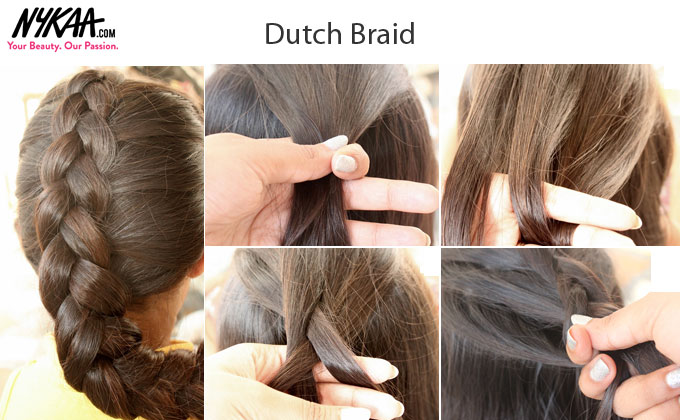
Step 1: Part your hair in the crown area in the same way you did for the French braid.
Step 2: Section the hair into three strands and start normal braiding with just a minor change. Instead of braiding the strands over one another as you did in the Dutch braid, do just the opposite. Weave your strands below each other while braiding. So for this braid you will tuck the strands under one another rather than over as you would do with the normal braid.
Step 3: Add small sections from the corresponding side while braiding as you did in the French braid.
Step 4: Repeat the steps until all the strands are tucked away neatly in the braid. Secure with an elastic band at the bottom.
As a final touch you can pull the strands of the braid lightly to make it look nice and fluffy.
3. Fishtail Braid
The easiest braid of them all and the prettiest too! If you want anAriel-like braid this is the one you should be learning! A loose braid, this one looks so pretty and mermaid-like that you could sport it every other day. This one is also perfect for a beach vacation or party with the right accessories. Want to try it? Just follow these simple steps.
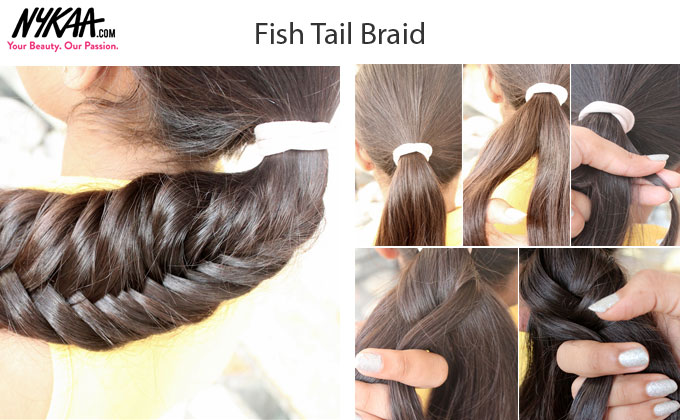
Step 1: Tie your hair into a pony tail. You may start without this step if you want a loose, messy fishtail braid.
Step 2: Section your pony tail into two equal parts.
Step 3: Grab a small section from the extreme end of the left strand and cross it over on the right side. You may allow this strand to mingle with the other hair of the right strand. There is no need to keep it separate.
Step 4: Now grab a small section from the extreme end of the right strand and cross it over on the left just like you did in Step 3.
Step 5: Keep repeating Step 3 and Step 4 for the remaining hair. Remember, the smaller the sections you grab for crossing over,the prettier the braid will look. Secure the braid with an elastic band.
You may again want to pull the strands gently from the sides to make the braid look fluffy. Add some cool bow clips or accessorize with a pearl headband to get the perfect beach babe look.
4. Rope Braid
With different types of braids to try, this is a very simple braiding technique if done correctly. It looks very pretty on long hair. This braid can be worn in a neat or messy style, and both look equally good for everyday wear and at chic evening dos where you can pair it with nice glittery accessories.Follow the simple steps below to copy the super-easy rope braid
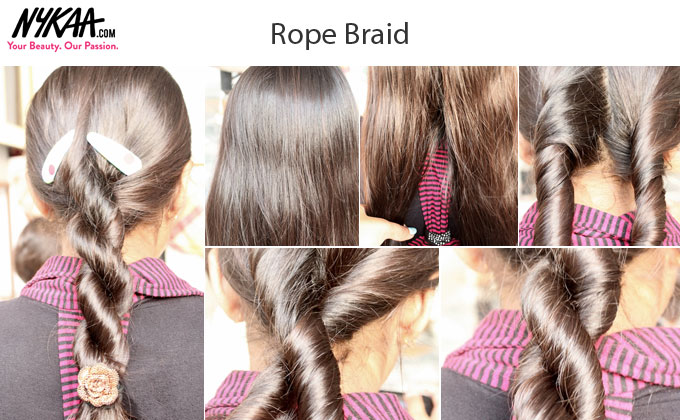
Step 1: Part your hair into two equal sections. You may want to apply hair mousse to strands (like TIGI Bed Head Hook Up Mousse Wax) to avoid stray, frizzy flyaways.
Step 2: Start twisting both the strands in an anti-clockwise manner till the end. Remember to twist it tightly to avoid any flyaway strands.
Step 3: Now twist both the twisted sections in a clockwise manner till the end. Remember to twist in the opposite direction to when you twisted the individual strands or the braid will come apart.
Step 4: Secure the braid with an elastic band.
5. Four Strand Braid
Amongst the different braid hairstyles this is a little trickybut nevertheless the final results are amazing and well worth a try. Girls with long hair will love this pretty braid style. An unusual braid that looks voluminous and different. In fact, it’s dressy enough to sport at a wedding too. You do need a little practice to get this perfect. Just follow the steps below to get it right.

Step 1: Comb and detangle your hair. Apply a hair serum (like FX Silk Drop Hair Serum) to smooth out frizz.
Step 2: Divide your hair in four equal sections. For reference, I have numbered them 1-4 from left to right.
Step 3: Now grab strand number 1 and cross it over strand 2.
Step 4: Now cross the strand 1 under strand 3. So now strand 1will bethe third from the left.
Step 5: Now grab strand 4 from the extreme right and bring it under strand 1 as shown in the picture.
Step 6:Now bring strand 4 overstrand 3 so that it becomes the second strand from left. The order will now be 2-4-3-1.
Step 7: Repeat from step 3 again considering strand 2 as 1 and braid it till the end. Secure with an elastic band.
It’s a bit of complicated but you will learn it quickly provided you remember that one strand from the extreme left goes over and under the other strands and one strand from extreme right goes under and over the other strands. Sport this unique four strand braid at a party or glitzy wedding and you’re sure to make a lasting impression.
Jinal Patel owner of the blog http://dazzlingbelle.com/ is a Delhi-based beauty blogger, adviser and makeup junkie with a serious passion for writing
Braids are back in style now! Don't trust us? Check out: