Fact: Gyms are too expensive. Also fact: You can’t expect your tummy to magically tone itself. So forget the gym and discipline your abs at the comfort of your home. How? Try planks and crunches which are the two mainstay exercises to reduce belly fat and tone your abs.
The best part’s that you’re not really expected to move. Sweet no? What’s even better is that they both have so many variations, you can save yourself from a boring sweat session.
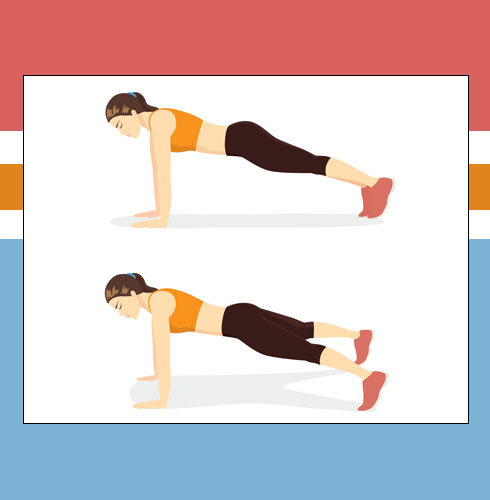
Plank is a core exercise that works major muscle groups in your body to build strength and endurance. It basically works your abs, obliques, shoulders, back, chest, hips, and buttocks. Plank is more forgiving than a push-up which requires you to move your body weight up and down. Although, plank can be strenuous and requires diligent practice to do it effortlessly.
Here’s a lowdown on the five variations of plank exercises to reduce belly fat.
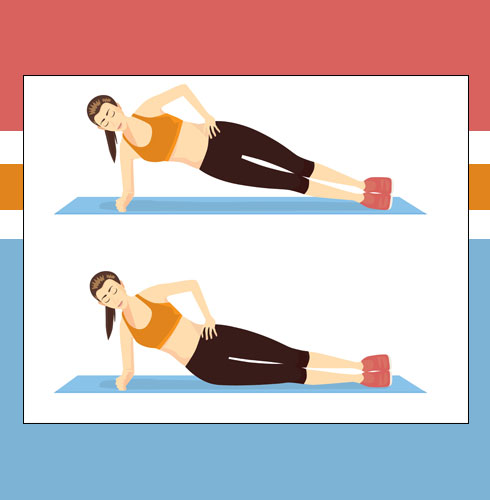
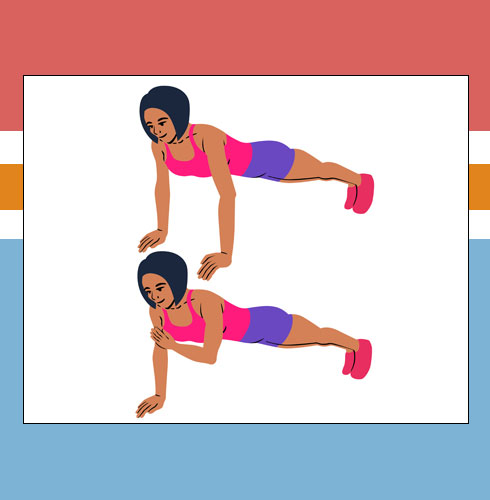
1. Side plank
Step 1: Lay on your right side with your right forearm resting on the floor and your elbow directly under your shoulder.
Step 2: Ensure both your legs are extended with the right foot stacked above the left foot.
Step 3: Contracting your abs, raise your hips until your body forms a straight line from your head to feet.
Step 4: Place your left hand on the side of your hips and hold the pose for 10 seconds.
Step 5: Slowly extend your right forearm and return to the original position. Keep switching sides and do 10 repetitions on each side.
Pro Tip: To maintain the position for longer, ensure you’re balancing on the side of your foot rather than the sole.
2. Reverse plank
Step 1: Lie with your back on the floor and arms extended beside your hips with the palms facing up.
Step 2: With your palms pressed against the floor, slowly lift your body until it forms a straight line from head to toe.
Step 3: As you contract your abs, make an effort to keep your arms and legs straight.
Step 4: Hold this pose for 30 seconds.
Step 5: Slowly lower your body and extend your arms to return to the original position. Do 20 repetitions.
Pro Tip: Press the soles of your feet on the floor while keeping your legs straight and firm.
3. Plank jack
Step 1: Lie on the plank position with your hands extended under your shoulders and your feet together. Ensure your body is in a straight line from your head to toes.
Step 2: Contracting your abs, jump and simultaneously spread your feet apart.
Step 3: Quickly return to your plank position by jumping and bringing your feet back together.
Step 4: Make an effort to ensure your arms remain steady in place and your back doesn’t arch during the movement.
Step 5: Keep doing this for 60 seconds and then relax.
Pro Tip: If you want to modify and make it less intense, you can simply slide your feet apart instead of jumping each time.
4. Plank with shoulder taps
Step 1: Lie on the plank position with your hands extended under your shoulders and your feet together. Ensure your body is in a straight line from your head to toes.
Step 2: Compress your abs and without swaying your body, lift your right arm off the floor.
Step 3: Move the right arm, bent at the elbow, diagonally across to touch your left shoulder.
Step 4: Bring the right arm back down to place the palm on the floor.
Step 5: Keep alternating sides and do 20 repetitions.
Pro Tip: While lifting your one arm off the floor, don’t let your hips droop.
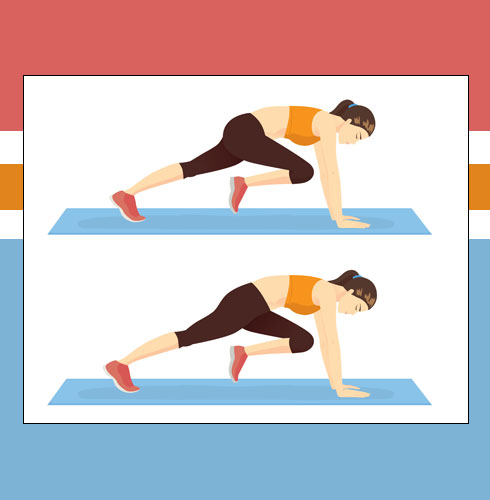
5. Mountain climbing plank
Step 1: Lie on the plank position with your hands extended under your shoulders and your feet together. Ensure your body is in a straight line from your head to toes.
Step 2: Draw your hands slightly apart and contract your abs.
Step 3: Pull your right knee toward your chest without elevating your hips. Hold this pose for 15 seconds.
Step 4: Extend your right leg backward to return to original position.
Step 5: Repeat with left knee. Keep alternating legs and do 20 repetitions.
Pro Tip: Extend your arms straight and don’t lock your elbows to avoid injury.
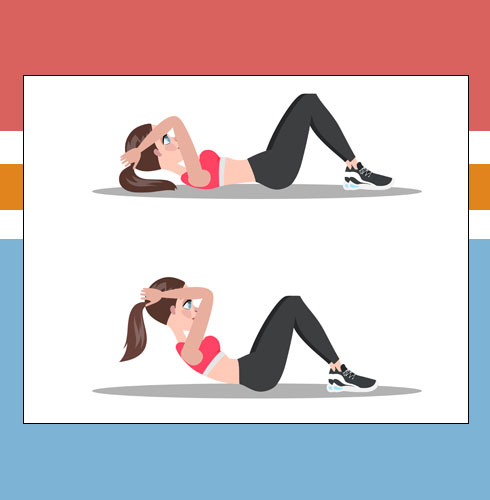
Crunch is an abdominal exercise that involves the entire abdomen but mostly works only the abdominal muscles which are a part of your core. So unlike plank, it only targets the abs and doesn’t work on other muscles of your core. This makes crunches a great bodyweight exercise to tone your abs if you’re looking to lose belly fat on priority.
Here’s a lowdown on the five variations of crunches exercises to lose belly fat.
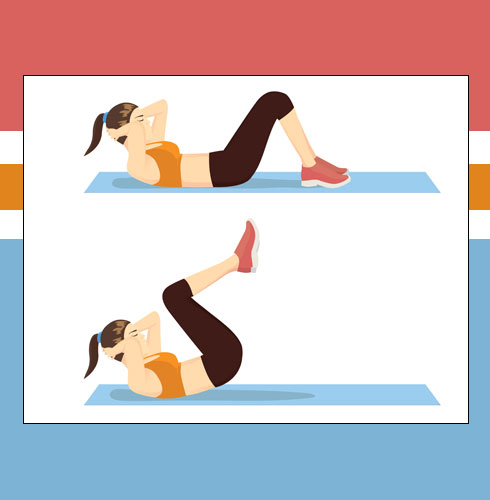
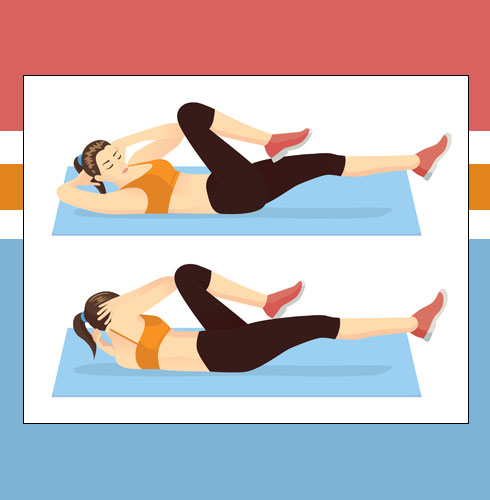
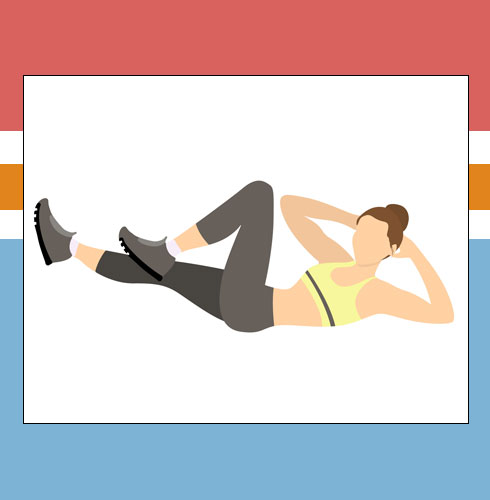
1. Bicycle crunch
Step 1: Lie with your lower back pressed against the floor.
Step 2: Place both your arms behind your head with your elbows wide.
Step 3: Tighten your abs and draw your navel toward your spine.
Step 4: Lift your shoulder blades off the floor and slowly bring your knees perpendicular to the floor.
Step 5: Now with your knees still bent, slowly pedal your legs in the air, alternating as though riding a bicycle. Do 2 sets of 20 rep.
Pro Tip: Avoid interlocking your fingers behind your head during this ab crunch as it could sprain your neck.
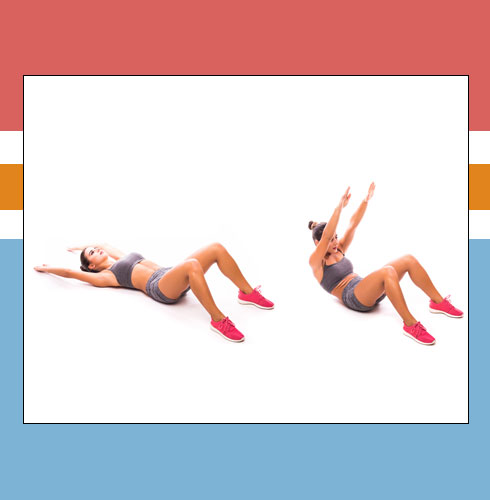
2. Long arm crunch
Step 1: Lie with your back on the floor and take the tabletop position.
Step 2: Extend your arms at the back of your head with the palms facing up.
Step 3: Engaging your abs, contract it to slowly lift your arms off the floor toward the ceiling. Ensure the arms are close to your ears.
Step 4: Simultaneously elevate your head and shoulders upto 45°.
Step 5: Lower your arms back down and return to the original position. Do 2 sets of 10 rep each.
Pro Tip: Ensure the movement of your arms is slow and controlled while keeping it alongside your head throughout the crunch.
3. Side crunch
Step 1: Lie with your back on the floor and take the tabletop position.
Step 2: Turn your hips to the right side so that your right thigh is resting on the floor. Keep your torso facing up.
Step 3: Now place your left hand behind your head and move your right hand on your right knee.
Step 4: Contract your abs to gradually lift your shoulders off the floor. Hold this pose for 30 seconds.
Step 5: Slowly reverse the steps and return to the original position. Keep alternating sides, performing 30 repetitions on each side.
Pro Tip: To add to the challenge, aim to lift your knees simultaneously as you crunch.
4. Oblique crunch
Step 1: Lie with your back on the floor and take the tabletop position.
Step 2: Place your hands behind your head with the elbows wide.
Step 3: Tighten your abs to lift your shoulder blades off the floor and slowly turn your body to your right.
Step 4: As you turn, bring your right elbow closer to your left knee. Hold this pose for 15 seconds.
Step 5: Slowly turn back and return to your original position. Keep alternating sides, performing 20 repetitions on each side.
Pro Tip: Concentrate on contracting your abs to get the abdominal muscles working.
5. Reverse crunch
Step 1: Lie with your back on the floor and take the tabletop position. Place your hands behind your head with the elbows flared out.
Step 2: Contract your abs to elevate your hips while ensuring the lower back remains on the floor.
Step 3: Draw your knees inward, closer to your chest.
Step 4: Slowly lift your shoulder blades off the floor and raise your head without using your hands. Stay in this pose for 30 seconds.
Step 5: Gradually lower your shoulder, head and legs to the original position. Do 20 repetitions.
Pro Tip: Keep your abs engaged throughout the exercise and don’t let your lower back arch or lose contact with the floor.